About Me

My photo
Hi all! My name is Becca and I am a 21 year old from Berkshire, England with an interest in all things cake. I have only been baking for the past couple of years and if someone had told me 5 years ago that I would be a passionate cake maker at the age of 21, I'm afraid to say I probably would have laughed in their face! I have had many cake disasters in the past (including a Barbie cake for my friend's 16th Birthday that was still raw in the middle when she cut into it...) However one Christmas I opened my stocking to find a Giant Cupcake making kit, and hey presto, my love for all things sweet emerged. I have developed this blog as a way of sharing my baking experiences with others. I love to read other baking blogs, you can learn so much from them and discover some great new ideas. Plus I just love looking at photos of yummy scrummy cakey goodness ;) (possibly a touch of 'food pornography' going on there!) Whilst I am still on a massive learning curve with my baking, I will share any tips I have with you as well! Thanks for popping by! Love Becca xxx

Tuesday 28 August 2012

The icing on the cake...

This post is dedicated to buttercream frosting. It comes in a variety of flavours, colours and styles and some people argue it's the best part of a cake. This post will look at 2 main things: how to make buttercream frosting and how to pipe it onto a cupcake.


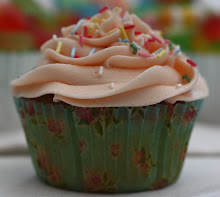
Yummy scrummy vanilla buttercream frosting, coloured baby pink

People are always asking for the frosting recipe I use on my vanilla cupcakes. Vanilla is a favourite because it's simple; most people like it; it can be easily coloured; and it compliments lots of different flavour cakes. The recipe I use is from the Primrose Bakery book. It's yummy and holds it's shape well when piped on top of a cupcake! Here's how to whip up a batch of creamy buttery goodness...


Vanilla Buttercream Frosting- Recipe from the Primrose Bakery
(The recipe says it's enough for 15-20 cupcakes but I find that if you want big swirls on top of your cupcakes then it's enough for about 12)


What you will need...

110g unsalted butter, softened
500g icing sugar, sifted
1 tsp vanilla extract
60ml semi-skimmed milk

Stand mixer or electric hand mixer
Spatula
Sieve
Scales


Method

Beat the softened butter in a bowl with the vanilla extract. 

Sieve in half of the icing sugar and add half of the milk and beat until well incorporated. Then add the the rest of the icing sugar and milk and beat for a good few minutes until the frosting is soft and light. 

By adding the icing sugar a bit at a time it helps to avoid the dreaded clouds of icing sugar that plume up into your face and gets EVERYWHERE. I really really don't like this bit, I feel like I need to shower just to get the layer icing sugar off my face and out of my hair! You can also minimise the plume by gently combining the icing sugar into the rest of the ingredients with a spatula before using the mixer. But at the end of the day, baking isn't meant to be a tidy hobby!! ;) 

Test whether the frosting is stiff enough to hold its shape when piped by seeing whether it stays on the spatula. If it's too runny add some more icing sugar. However you don't want it too stiff either otherwise you will really struggle to pipe it onto your cakes. You want a nice smooth texture :-) If it is too stiff just add a little bit more milk.

freshly whipped vanilla buttercream
Step 2 is piping the frosting onto your cupcakes. I like to use a large open star nozzle. I bought a "professional piping set" from Lakeland that had 7 different large nozzles in and I use the open star tip for all of my cupcakes, as it creates such a nice soft swirl. 


To apply the frosting to the cake, fill a piping bag with the frosting using a spatula. I prefer to use disposable piping bags as I find them easier to use and it means you don't have to faff around cleaning them out after you have used them! Only half fill the piping bag otherwise you will have buttercream all over your hands by the end of it (which means you can lick it off your fingers but there may not be enough to ice your cupcakes!!!)

Piping chocolate frosting onto chocolate cupcakes- sorry it's not vanilla but the method is exactly the same for both!

Start at the edge of the cupcake. It is nice if you leave a little bit of the cake showing so people can see what type of sponge lies underneath the frosting. Gently squeeze the top of the piping bag and work your way around. When you reach the other side keep going and pipe another swirl on top. Finish by releasing your grip on the piping bag and pulling away from the frosting.


This technique should help you achieve deliciously indulgent looking cupcakes that you can decorate in any way you want. Add chocolate, sweets, sprinkles, cookies, letters/numbers, chopped nuts, fruit, sugarpaste decorations...the list is endless!

I hope some of you find this helpful. Keep your eyes peeled for Baking Challenge number 2 over the next few days (I promise I WILL do another post on that soon!)

In the meantime, Happy Baking!

Love Becca x

Thursday 23 August 2012

Chocolate Malteser Slice (with a touch of Mars Bar!)

This post isn't really part of my Baking Challenge, but I just had to share something AMAZING with you!!

Yesterday I had a serious case of the chocolate munchies. But instead of popping to the shops to buy a standard bar of chocolate I decided to surf the net for for something chocolatey I could make. My favourite chocolate of all time is Maltesers (especially the Malteaster Bunnies that emerge during the Spring mmm. And I am quite partial to a Minstrel or 50 as well). Anyway the point I am trying to make is I wanted to make something with Maltesers in!

That's when I stumbled across a recipe called 'Malteser Traybake' on the Nigella website. Very similar to a rocky road, it is a concoction of chocolate, butter, golden syrup, Maltesers and crushed digestive biscuits, all mixed together and left to set in a tin before being cut into squares ready for sharing (or not sharing, which you may decide once you get a taste for it!)

I decided to put my own twist on the recipe and add some chopped up Mars Bar to it as well for extra chewiness. Instead of putting it into a square tin I used a loaf tin, which means you can cut off big slices of it (although to be honest it doesn't cut brilliantly well- you sort of get big chunks breaking off in your hands, but this isn't really a problem and possibly even more satisfying!)


It had already been half eaten before I could even get a good photo!


It is very quick and easy to make, which means you don't have to wait long to eat it. But I will warn you...once you begin eating this, it is VERY hard to stop. It didn't last long in our house at all! My boyfriend has even requested I make it for his birthday instead of a cake. I'm sure it's not kind calorie wise though...so maybe it's best I don't make it too often.

You can find the recipe for the delicious chocolate treat below. But it does come with a warning, because once you try it, you will be hooked forever! The recipe does make quite a lot, so it's good if you have a large group of people to feed. I filled up one loaf tin and an 8" cake tin with this recipe, so if you don't want to make that much then you can just halve the recipe.

Chocolate Malteser Slice (with a touch of Mars Bar) 

Ingredients:

200g unsalted butter
6 tbsp golden syrup
400g milk chocolate (I used dairy milk), plus extra for the topping
250g crushed digestive biscuits
2 sharing sized bags Maltesers
2-3 mars bars, chopped into pieces

Method

Line a loaf tin with greaseproof paper.

Melt together the butter, golden syrup and chocolate in a double boiler **see tip**

In another bowl combine the biscuits, Maltesers and Mars Bar.

Pour the chocolate mixture over the biscuits, Maltesers and Mars Bar then stir together. Pack the mixture into the prepared tin and refrigerate until set. You can also melt down any leftover chocolate and drizzle this over the top.


Voila! Easy as 1-2-3. And INSANELY yummy. If you like chocolate, I strongly suggest you try this. Now. Eat and enjoy :-)

Happy Baking!! <3


Tip for melting chocolate:
When I first tried this recipe, I melted the butter first, then added the golden syrup and then the chocolate. But the mixture went really lumpy and grainy when I did it this way. I think the butter was too hot for the chocolate. So it's best to belt the chocolate first, then add the butter and syrup. 

Monday 20 August 2012

Baking Challenge 1: Summer Berry Pavlova

As a lot of you will know the Great British Bake Off has just returned to our screens, turning a dull Tuesday night into one of excitement and happiness (well- it has for me anyway!) Last week I went out and purchased a copy of the new Bake Off book called "How to turn everyday bakes into showstoppers" and I must admit I am quite in love with some of the recipes in there (toffee apple and pecan pudding anyone?!)


As I am on summer break from college I have more free time on my hands than is probably good for me. So I have decided to set myself a baking challenge. I have picked a handful of recipes from the Bake Off book (some from the first book as well) and I aim to make as many as I can over the next few weeks/months/however long it takes to eat that much cake!!! 

I started my baking challenge this weekend. We had all the neighbours over for a BBQ so this was the perfect opportunity to put my skills to the test. Unusually for the UK we actually had a very sunny and warm weekend so I wanted to make something that was light and fruity. Low and behold the Summer Berry Pavlova...

I used the recipe from the first Great British Bake Off Book ("How to Bake") for 'Pavlova with Mango and Passionfruit' p254. Whilst this does sound delicious I had some blackberries given to me from my boyfriend's mum who grows her own fruit and veg so I wanted to make good use of them. I decided I would do the same recipe for the meringue but adapt the filling. You could really use any fruit for a pavlova. I chose blackberries, raspberries and strawberries.

I had never attempted meringue before but I have heard from others that it can be hard to master. I was determined to give it my best shot! I got all my ingredients ready. Eggs were at room temperature (which is apparently vital in increasing the volume of the meringue) and I had even managed to separate the egg whites without a trace of yolk! I whisked my egg whites in a grease free bowl, added caster sugar a tablespoon at a time...

WOOPS!!!


Even though I was trying to be so accurate I had somehow managed to miss out a step completely! I was supposed to add the cream of tartar and salt before adding the sugar and then whisk the egg whites until soft peaks had formed, which I hadn't done! I was so annoyed with myself but I kept going in the hope it would still work out, knowing I had enough ingredients to do it again if not. I added the vanilla extract and cornflour then spooned it onto a baking sheet, stuck it in the oven and hoped for the best. Amazingly it still came out just fine!

Below is the recipe for the Summer Berry Pavlova which was actually very tasty and went down a treat at the BBQ! The meringue was just as it should be for a pavlova- crisp and airy on the outside with a nice chew in the centre. If anyone tries it let me know how it worked for you!


Summer Berry Pavlova
Serves 8

For the meringue

3 large free-range eggs at room temperature
Half teaspoon cream of tartar
Pinch of salt
175g caster sugar
Half teaspoon vanilla extract
1 and a half teaspoons cornflour

For the filling

300ml pot double cream
Strawberries (chopped and halved if necessary)
Rasberries
Blackberries

Method

Preheat the oven to 140C/275F/gas mark 1 and line a baking tray with baking paper.

Place the egg whites in a grease free bowl and whisk until frothy (this should take about 20 seconds).

Add the cream of tartar and salt and whisk until whites stand in soft peaks.

Whisk in half the sugar a tablespoon at a time. Add the vanilla and whisk until whites stand in firm peaks (you can test the readiness of the whites by turning them upside down in the bowl- if they stay they are ready, if not then you will get covered in egg whites).

Scrape down the sides of the bowl then add the rest of the sugar and sift in the cornflour. Incorporate these into the egg whites using a large metal spoon. 

Spoon the mixture onto the baking tray. You want to create a circle with raised edges so the filling has somewhere to sit. 

Bake in the oven for 1 hour 15 mins. When the meringue is done it will be very crisp on the outside. When it is cooked turn off the oven and leave the pavlova to cool in the oven completely with the door closed. This can take a while but it is essential. 

You should assemble the pavlova just before you serve it. If needs be you can store the meringue in an air tight container (or if you don't have a container big enough like me then you can wrap it in foil).

To make the filling wash and dry the fruit. Whip the double cream until it is thick, but be careful not to over whip it. I tested the consistency of the cream by seeing if it stayed on a spoon when turned upside down. Spoon the cream into the centre of the meringue and top it with the summer berries.

Happy baking and keep an eye out for my next baking challenge over the next few days...!
Love Becca x


Wednesday 1 August 2012

General Blogging

If I am going to really get into this blogging malarky then I need to get my blogger's head on! I have already found myself thinking on a day to day basis, "so and so will make a good blog post" but unfortunately I am not very good at following up on these thoughts yet... and I blame one thing. My lack of a decent camera!

In my opinion a good blog includes lots of photos. I do take lots of photos of my cakes to put on Facebook but I only have a basic digital camera to use or my iPhone, and to be honest they aren't any good when taking photos with lots of detail! My boyfriend has a great Nikon camera which he very kindly lets me use from time to time, but it means that if I am in the midst of baking and want to photograph some things to stick up on here as a tutorial then I don't have a good camera to use on the spur of the moment.

So, planning ahead, if there is going to be one thing on my Christmas Wish List this year it is a good, decent camera. Then there will be no stopping me!

Has anyone got any good recommendations for cameras? Food photography isn't always easy, so if anyone out there has any tips of photographing cakes then please feel free to share them!


This is not my cake, nor my photography. But I wanted to show you an example of how I want my cake photography to eventually turn out! Plus I couldn't state that a good blog needs photos and then not include any photos, could I? :)
Love Becca x

Easy-Peasy way to fill a cupcake

Whilst there is nothing wrong with a simple cupcake topped with a dollop of frosting, sometimes it may call for more. Maybe a squidge of jam, a gooey chocolatey centre, the bitter tang of lemon curd...

One thing I have noticed since I started baking is we live in a world full of 'gadgets'. There is a 'gadget' for everything, including for filling cupcakes. Don't get me wrong, gadgets can be very useful (if you know how to use them properly) and if you have a particular 'gadget' that you enjoy using then of course you should keep using it. But this blog is for those of us who may not have a special piping nozzle or a special cutter to use to fill our cupcakes. It takes us back to basics using just a simple sharp knife :)


Step 1:

Using a sharp knife cut a hole in the centre of the cupcake. It is very important you do not cut all the way to the bottom of the cupcake, otherwise the filling will not be in the cupcake but rather all over the consumer's hands! Cut about two-thirds of the way down.


Step 2:

Gently pull out the centre of the cupcake, leaving you with a hole in the centre of the cake. Do not throw away the centre of the cake!!
 Step 3:


Using a teaspoon fill the cupcake with your chosen filling. I filled the vanilla cake with strawberry jam. Be careful not to overfill the cupcake- about two thirds should be enough.

Note- you may find it easier to slightly warm the jam first to make it easier to work with.


Step 4:

Gently push the centre back into the cake. This gives you a smooth top ready for piping your frosting on. It also prevents any cake from going to waste!

And that's it! Easy as pie (or cake in this case...)

Happy Baking!
Love Becca x